

web.jpg)
User information
This information is to give persons who have accepted NordSIMS projects an idea about how we work here at NordSIMS and other information you need to be able to start planning your time together with us here in Stockholm.


General information
The laboratory is usually staffed Monday-Friday 8.00 a.m. - 5.30 p.m., and all scheduled time will be weekdays. You have complete rights to the number of days you have been granted during this time.
After one day of instrument training it is possible for interested users to keep on running during late evenings and nights. If any problems show up during this period you cannot count on getting support from the staff. Unfortunately we cannot compensate you if you lose time during the nights.
If you have been scheduled for Friday and nobody else will run over the weekend you may continue running - please check beforehand if you think you might want to use the weekend. The basic condition then is that you run around the clock because, if you once turn the machine off, nobody else will be here to start it for you again.
NOTE: Most analyses are now automated for unattended running - the requires careful planning of your analytical sites before arrival.
Prepare and document samples
You should start to prepare your samples as soon as possible, see Sample Preparation below. It is very good if you have the possibility to document your grains with CL- or BSE-images before analysing. For SEM the sample should be coated with a thin goldlayer (approx. 2-5 nm). We ask you to not use carbon if possible, because we have experienced problems after carbon coating a few times.
NEW for 2006: We have now established a causal link between some cases of reverse discordance behaviour in U-Pb zircon analyses and excessive SEM-induced damage to epoxy around grains. In cases where we consider this to be a likely problem, it may be necessary to re-polish your mount before undertaking SIMS analyses. If you think this might be a problem, please contact us.
Contact us to be scheduled
To be scheduled you have to contact Martin Whitehouse. You will get your days in, from a few days up to several months depending upon the reservation, the status of the instrument and how many days you need.
Your visit
When it is time to visit us here in Stockholm we prefer if you arrive the museum about 9 a.m. the day you will start to analyse, but feel free to come the day before. Go to the main entrance and ask for any of us in the Nordsim group. We will meet you there and get you an identification-/passingcard to the outer doors.
It will save time if we already have the samples here at the museum. Then it will be coated and put into the machine when you arrive. If you have old samples and the analyses are completed we appreciate if you bring the mounts back to us because we want to cut off the standard pieces and re-use them in another mount.
We recommend that you make flexible travel arrangements if at all possible - we cannot guarantee that the machine will be as enthusiastic about your visit as we are!
Sample preparation
Note: This section is particularly applicable to zircon U-Pb work. For other types of samples, please contact the laboratory.
You should start to prepare your samples as soon as possible. Zircons will be cast together with standard in an epoxy puck and polished to get a cross-section through the grains. This can be done in several ways depending on which resources you have in your own institution.
Alternative 1
Some people handle everything themselves but then you need to have suitable standard available (91500 for zircons). However, you should discuss the preparation routines with us before you start to avoid unexpected problems (for example wrong epoxy or contamination).
Alternative 2
The most popular alternative is that you pick your own grains, mount them on a piece of two-sided tape and send this to us. Then we can add standard, cast it and polish the samples. We prefer to have the samples well in time, and certainly more than two weeks before you need it.
Detailed instructions applicable to Alternative 2
- It is quite important which tape you use to mount your grains on. We prefer to send you some.
- Fix the two-sided tape (»5x5cm) on a stiff flat surface (preferably plexiglass; if using real glass, please ensure that it is at least 4 mm thick - thin glass presents a considerable injury risk when the mount is removed). Ensure that there is no air under the tape.
- Remove the paper protection from the tape and mark the areas you can use on the tape (the areas are described in fig.1). Do not discard the paper protection because you have to put it back when you have finished picking.
- Mount your grains according to the instructions in fig. 1.
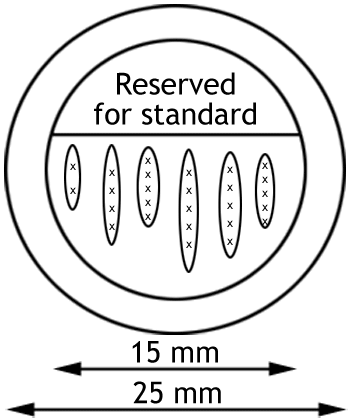
Sample holder. Click to enlarge.
The sample holder
See Fig. 1. The casting form is 25 mm in diameter. However the sample holder of the ion-microprobe has an edge, which covers the puck partly. For that reason you should put your grains in the centre of the mount, minimum 5 mm from the edge
The above is specially important for light stable isotopes!
You can mount the samples in rows as you see in the figure. If one row for example is shorter than the others it is easier to orientate. Try to put the grains as close as possible because it also makes everything much easier, later on.
Notice that it is impossible to put them too close to each other. Keep a map - mount view will be reversed in the probe so choose an unambiguous pattern. If you have grains with very different sizes, you should consider making another mount.

Picture1. Good mount, samples close together in the center of the mount.

Picture 2. Bad mount, samples too far apart and some too close to the edge.
Keep surface clean,no dust, no hair,etc
Try not to move around samples.
Make sure samples are clean and dry.
Don´t pick in ethanol,we prefere that you pick ”dry”.
Don´t cut in tape.
Use ”center” part of sample plate.One area is reserved for std.
Best part for analyses in SIMS is the center part.
Keep std area clean
When you have mounted all your grains, you have to cover the tape with the paper protection again before you send it to us.
Address:
Naturhistoriska riksmuseet,GEO
Kerstin Linden
Svante Arrhenius väg 3
S-114 18 Stockholm
Sweden.
GOOD LUCK!!!